Feeds:
Posts
Comments

Archive for the ‘outdoor classroom’ Category

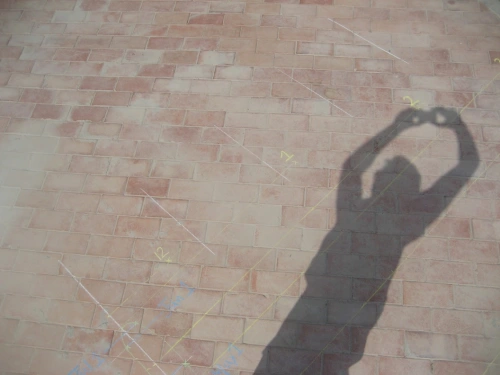
photo[4]For some reason after a few years of blogging, my most popular post remains how to make a human sundial. Just last week I received an email from a PTA president in Texas who actually had a human sundial built at their elementary school and was looking for ideas on how it can be incorporated into their curriculum. Even though I don’t teach elementary school any more, building our human sundial (pictured above) was a blast and there’s some great teachable moments that it can provide. Here’s some ideas:

In Kindergarten we have a science unit about sun and shadows, and one of the learning goals is about how the length of shadows changes during the day. The sundial is a great focal point for this, as classes can visit it in the morning, at lunch, and again in the afternoon and observe the difference in the direction and length of the shadow. Depending on the grade, they could even measure the length of the shadow and compare it to the height of the sun in the sky at that time. It’s a clear way of understanding that the higher the sun is, the shorter the shadow, as well as the idea that the sun moves across the sky and the direction of the shadow changes. After observations, we’ve even done drawing assessments where students predict what the shadow would look like given a position of the sun. You could use an actual picture of your sundial for this, and students could then check their predictions the next day to see how accurately they predicted the length and direction of the shadow. Here’s the link to a hands-on science unit you can buy from Delta Science Education that gave me some of these ideas.

In 5th grade our students study the seasons, which is a good opportunity for students to learn about why you need to stand in different places on the sundial depending on the time of the year. It could even be a good opportunity for a long-term study: each day or once a week in the morning, have students observe the sundial at a particular time, noting the position of the sun (measurements could be made with a compass). Students will begin to see how the position of the sun fluctuates with the seasons, which leads to the idea that some seasons have more direct sunlight (and therefore more heat) than others. Another approach which I wish I could try would be to have no date stones on the sundial at all in the beginning of the year and explain to the 5th graders that you aren’t sure how the sundial works. Then you could give the students the job of “calibrating” the sundial, visiting it at the same time each day and marking where they need to stand to make the shadow point to the accurate time. After a few months they would begin to notice the analemma (the shape that represents the changing position of the sun, pictured below) and it’s this shape that allows you to know where to stand exactly to make the sundial work. Here’s a kid’s science site I found about someone who actually tried this with really neat results!

Read Full Post »

When I first arrived at my school 4 years ago, outside the new elementary science lab was a large sandpit surrounded by a fence. In the middle of that sandpit was an empty swimming pool.
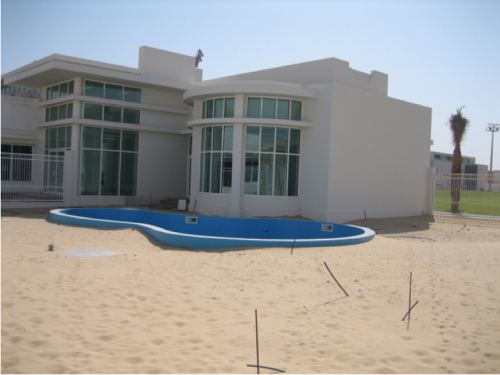
My initial reaction was WTF? Then it was explained to me that when the school recently expanded the intent was to build an outdoor pond area. Unfortunately this desire wasn’t communicated clearly to the construction company, who interpreted “pond” to mean “pool” (such is life in Qatar). So we ended up with a swimming pool in a sand pit…. grrrrreat.

Thus began my 4-year quest to transform this wasteland into something of educational value. Since our school is located in the often-sweltering desert city of Doha, students don’t have much of an opportunity to explore the outdoors. They don’t have the same connection with nature that I was fortunate to have growing up in the woods of Connecticut- which is a problem if we expect our students to care about the environment or life sciences in general. (For a great read on this subject of “nature-deficient” kids, check out Last Child in the Woods by Richard Louv) So my vision was to create an outdoor classroom, or as a wrote in the grant proposal:

To create a naturalistic outdoor learning space where students can be inspired to learn about the natural world even in the confines of our urban surroundings.  Upon entering the outdoor classroom through a vine-covered gate, students will be immersed in a lush, active ecosystem, surrounded by a diversity of plants and animals: butterflies pollinating flowering bushes, birds nesting in trees, and fish thriving in the pond. Opportunities for learning in this natural setting will be diverse as well, from learning about life cycles by growing vegetables in the planter beds, to collecting weather data using meteorological tools at the weather station, to understanding the relationship between sun and shadows on the sundial patio. 

It’s taken 4 years with several setbacks along the way (unsuccessful applications for funding, multiple contractors with conflicting visions, and many different designs and revisions), but I’m happy to report that it has been well worth the effort. This year our outdoor classroom has finally taken shape, and  it is a swimming pool sandpit no more! 🙂

Here are some of the features of our new learning space:

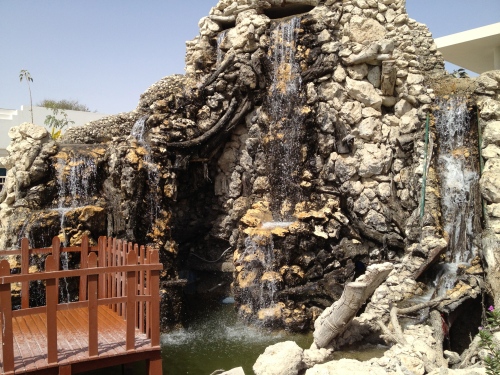
Koi pond and waterfall: Not only is this the atmospheric centerpiece for the area, it’s also a wonderful tool for the 4th grade to learn about a real live ecosystem. Producers, consumers, and decomposers are all present in the pond to observe and learn about how they interact. The wooden dock enables us to easily (and safely) collect water samples for closer study.

Human sundial:  Kindergarten and 5th grade students both learn about objects in the sky, and a human sundial is a great way to observe how the Earth and Sun interact. Kindergarteners can observe how their shadow changes length and direction over the course of the day, and 5th graders can puzzle about why you need to stand in certain spots at different times of the year to make the sundial work correctly. For more on how to make a human sundial, read my previous post.


Tortoise habitat: How does Eddie the tortoise survive in the desert? 1st graders compare the form and function of desert tortoises with the turtles we have swimming in our lab aquariums.  3rd graders study the adaptations of desert animals to figure how Eddie beats the heat (hint: he’s currently hibernating under the sand!).


Weather tree: Even though the weather in Qatar is almost always sunny, our 2nd and 4th graders learn there’s more to the weather than that! Our weather tree is equipped with digital thermometers to keep track of temperatures over the course of the year, a psychrometer to measure the (often terrible) humidity, a barometer to track air pressure, and an anemometer to gauge the speed of the wind. Oh yes, there’s a rain gauge too- but in case you’re wondering, it’s empty.


Gardening beds: As long as you avoid the summer months, Qatar with all its sun is a great place for a garden. 2nd graders can grow beans to observe how they grow and change throughout their life cycle, and 3rd graders can experiment with different types of plants to see which are best adapted to the desert climate.


Renewable energy investigations: How can we harness the renewable power of the sun, wind, and water? 5th graders learn about energy sources by designing solar ovens, and then testing their efficiency at heating up a cup of water. For next year we’ve also ordered some K’Nex renewable energy kits, so we can experiment with the design of wind turbines, water turbines, and solar cells.


But wait- that’s not all! Besides scientific pursuits, the outdoor classroom is also a great setting for art, writing, or any activity that benefits from a natural surrounding. With water and many flowering plants the area is a haven to local birds and insects, so there’s plenty of life buzzing about to inspire words or pictures.

I must admit I’m going to miss having this right outside my doorstep next year when I move up to the Middle School, but you’d better believe I’ll be bringing my students down here for visits!

Many thanks to Exxon Mobil for their generous grant to fund construction, Hussein Jameladin for transforming the swimming pool into Doha’s largest man-made waterfall (out of recycled playground structures!), Khaled Mansour and company for completing many of our unfinished projects, and the Doha Public Gardens for donating so many of our plants and trees.

Read Full Post »

Human sundial

Last year I was lucky enough to receive a grant to build an outdoor classroom at my school, so throughout the school year I’ll be brainstorming ways to make the most of this new learning space. Living in the hot and urban environment of Doha, Qatar, my students don’t have much experience with the outdoors, so I think there’s going to be a ton of opportunities for learning across many different disciplines.

One outdoor classroom project that I’m working on right now is the Human Sundial. It’s similar to the boring old sundials you’re probably familiar with, except that it’s your shadow, and not some little stick’s, that points towards the correct time. Another cool feature of this type of sundial is that it corrects for the change in shadows over the course of the year. For those interested in details, this kind of sundial is technically known as a analemmatic sundial; the analemma is the name of the shape created by the apparent movement of the sun’s location in the sky over the course of the year.

In this post I’ll explain the nuts and bolts of how to make one of these yourself (it’s not hard- I just did it this afternoon!), but first I want to share some ideas for how I’m going to use this as a teacher in (whoops- I mean outside of) the classrom.

Teaching with the sundial

Any time a teacher has a cool tool like the human sundial, there’s the danger that you assume students will just somehow “get it” when you show it off in some classroom demonstration. Even if the demo has a wow-factor, more often than not students will leave remembering the phenomenon, but not the un-wowing explanation that follows it. So how to prevent this?

First of all, I’m not going to show the students the sundial right away. That would be like starting a mystery movie by revealing the culprit in the first scene- boring! First I want students to discover how tricky telling time with the sun actually is. With my kindergarten students, who are mostly focusing on shadows, we could begin by just tracking the shadow of a stationary object (like a flag pole) throughout the day. Maybe have a student mark the end of the shadow every hour, or if we wanted to get hi-tech we could try a time-lapse video. If we have a few classes do this and compare the data, I think the students will readily realize that shadows point in certain directions and have certain lengths at different times of the day. I could then up the ante for comprehension by having a shadow prediction contest (where will this flagpole’s shadow be at 3:30?). The Kgers could then even make their own simple sundial using chalk like I did, and record videos of themselves explaining how it works (assessment, baby!).

For my 5th graders, who also have an astronomy unit and learn about the rotation and revolution of the Earth, I’d like them to learn about the whole analemma effect- how then sun’s apparent location and shadows change over the course of the year. It’s safe to assume they won’t have many prior conceptions about this, and probably think the sun’s path in the sky is relatively constant- so I can exploit that misconception for my own devious learning intentions! I plan on installing the human sundial in the outdoor classroom- but without the analemma date thing to stand on. I’ll just mark the spot that works in September so the students will be none the wiser when they check it out at the beginning of the year. As time marches on though, the sundial will get worse and worse at time-keeping, and by January it should be downright awful. This would be a great time to raise the alarm and have the student’s try to figure out what’s going on. To juice this for all it’s worth I’ll need to make sure there are some grade-level appropriate resources out there that they can use though (any help here would be much appreciated). Then I can use their suggestions and introduce the analemma to fix the sundial…. until next year of course!

Setting up the sundial

I’m no sundial guru, so initially I tried to order up plans for a human sundial from here. Unfortunately, because Qatar’s latitude of 25 degrees North is nearly in the tropics the owner actually refused to sell me the plans, even after repeated requests, because he was worried the sundial’s accuracy and somehow his company’s reputation would be compromised. Whatever. While it’s true that in the tropics shadows aren’t very long in the summer at high noon, we won’t be using our sundial in the summer, and I don’t think Kindergarteners will be too concerned with pinpoint accuracy. At any rate- you definitely don’t need to go out and spend money on plans for a human sundial, because there are plenty of free resources just a click away. So let’s get started…

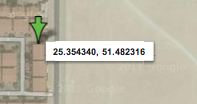
  1. First you need your exact latitude and longitude. You can use a GPS for this, or you can just go to Google Maps, find your location, and then right-click on it and select “What’s here?”. This will place a little green arrow on your location that you can hover over and get the latitude and longitude. It leaves it up to you to figure out if you’re North or South of the equator and East or West of the prime meridian (good luck with that!).
  2. You also need to know your time zone (how many hours plus or minus Greenwich mean time), and whether you’re currently having daylight savings time. Since Qatar doesn’t bother with daylight savings, this doesn’t affect me, but it will require some alterations to your sundial if you are in a place that does.
  3. Make sure your sundial location is level. You could use one of those bubble-in-liquid carpenter-thingies to do this, or you could do what I did… take a look at your space and say “Looks pretty level to me!”.
  4. Then you need to find true North. No, you can’t use a compass because they point towards magnetic North. There’s a variety of ways to figure out true North, but I think the easiest method is using Solar Noon (when the sun is at its highest point on the horizon), because all you need are some household supplies to make a straight shadow at the time of Solar Noon. Here’s a good explanation of how to do it. Don’t feel like you need to go get all the construction materials though- I hung my weight off an overhead car shade and just traced the shadow with chalk on the pavement.
  5. Once you have a true North/South line set up, then you can start setting up the sundial. To get an idea of what the finished product will look like, I recommend checking out the applet on this website which draws the analemmatic sundial for you when you input the above info (see picture below). You can actually print this out and use it as a mini-sundial as well, just make sure to line it up with your true North/South line.
  6. So far so good? Now on to the human-sized sundial! The math for creating one of this sundials is pretty complicated, so to avoid crunching the numbers yourself, you can use a spreadsheet like this. This spreadsheet might seem a little daunting at first, but the only info you need to input is the cells in blue on the first sheet. Besides the info above you’ll also need to find out your time zone meridian which is the middle longitude for your time zone (you can find this on the picture here, just look at the longitude number above your time zone- for example Qatar’s time zone is +3 so the meridian is 45 degrees East). Finally you need to input the gnomon height, which is simply the height of the thing casting the shadow- you!

When the spreadsheet spits out your numbers, just check the pictured sundial on the sheet called “Layout” and make sure it’s identical to the mini-sundial made by the applet. If it is, you’re ready to start building the real sundial. Start by creating an origin point (like 0,0 on a graph) somewhere in the middle of your true North/South line. Then it’s just like making a giant graph- use the x and y coordinates to plot the hour markers, and the x and “date point Z” coordinates to plot the dates. I did mine in chalk first on the pavement to check if it actually works.

Taken just after 2pm. Boo-ya!

For more information on how you can use a human sundial for some great learning activities, check out my follow-up post here

Read Full Post »