 This school year was my second year going paperless with my science classes and using digital notebooks. Since starting out I’ve learned quite a lot: how to make digital notebooks easier to use (for students and teachers!) and how to make them more effective tools for learning. Over the past two years I’ve also received a lot of queries from other teachers out there who are trying to do the same thing, so I wanted to share my updated version of a digital science notebook, as well as some tricks of the trade from a paperless “veteran”.
First off, here is the link to my digital notebook template. Feel free to try it out for your own class, modify it however you want to suit your needs, but please share your experiences for others to benefit from! Digital notebooking is very new terrain in education, despite the fact that technology has become such a pervasive part of our lives. Only by teachers sharing our experiences and ideas with each other will education ever catch up and start realizing the potential that technology has for learning. For more details on how to set up your own digital notebook, check out the tutorial videos on my digital notebook page.
Now for some advice about digital notebooks for those of you interested in giving it a go. I’d like to share four digital notebook secrets I’ve learned from my experience, but before I do that, please keep in mind that my Middle School has a 1 to 1 laptop program, and most of my students are already fairly computer savvy. The digital notebooks we use are based on Google Apps, specifically a Google Site that each student creates from a template that acts as their notebook, and the documents inside there notebook are mostly Google Docs and Google Sheets. I’m not sure how well my ideas would translate to other devices (like tablets/iPads) or other platforms (like Evernote/Notability), but if you have ideas about this I’d love to hear it! In my opinion though, digital notebooks work best when students have their own laptops and when you just embrace the amazingness that is Google Apps. But on the tricks of the trade…
#1: Scaffolded Notes
In much the same way you would model good note-taking with a paper notebook, the best digital notes are also scaffolded. Each of the notes documents that I share with my students is similar in a lot of ways to good old worksheets. Except that rather than working independently and quietly, the digital notes I use are designed to drive animated class discussion and collaboration between students.
What do digital notes look like? I use Google Docs to create a document for each lesson, and then share that with my students the day of class (more on sharing later). Right off the bat this digital document has advantages over paper: at the top of the document there’s a section stating the standard this lesson relates to, with a link a Study Guide I create with learning resources about that standard (more on Study Guides later too!). So if a student needs to review something, or they are absent and miss a lesson, they can use that link right on the lesson’s document to guide their learning.
The rest of the document is a series of instructions and questions that look like this one from my Rocks Introduction notes (click here to see the whole notes document):
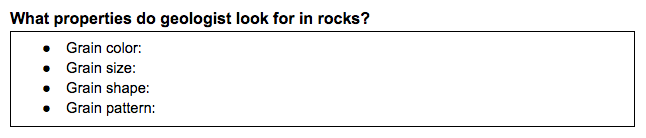
I scaffold note-taking for my 6th graders by using questions or sentence-starters followed by 1-celled tables. The 1-celled tables act like a blank on a worksheet, guiding students where to take notes. In the example above there’s a key question for the lesson, followed by a 1-celled table with a scaffolded response: bullet points for each of the main points that a student will describe during the lesson.
So far, this is about the same as the worksheets of yesteryear, but it doesn’t stop there! Because digital notes are an online document, you can easily insert elements that are impossible or difficult to do on paper: full color images, animations (gifs), editable drawings. Here’s a couple of examples from the same Rocks Introduction notes as above:
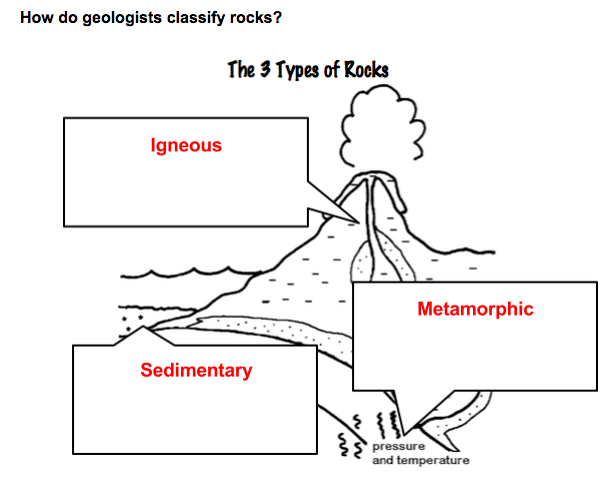
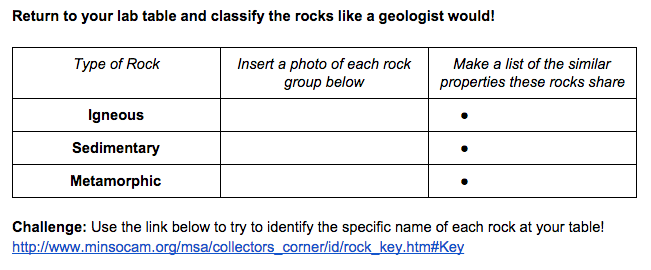
As you can see, the first 3 Types of Rocks example is a diagram for students to label. This is easily created by inserting a Google Drawing inside the notes document. To edit the diagram and label it, all students have to do is double-click on it. In addition to typing in text in the text boxes I created, they can also easily add their own colors, arrows, and images from the web. For example, in each of the boxes above, students could type an explanation they learned in class and add an image of an example from they find on the web. In the second example, which is from a lab activity in the same lesson, students complete a data table by inserting their own pictures of the rocks they classify (which can be snapped directly with their laptop cameras by inserting an image within the notes document), and then also write a list of properties using a bulleted list I started. Finally, I also provide a challenge activity by including a link of a website with a great dichotomous rock key that students can use to attempt to identify the particular types of rocks they are observing.
Oh, and don’t forget the collaborative element! Because this is a digital document, it can be shared and edited however you like. So I will routinely have lab teams work collaboratively on a common digital document or have students peer-edit or peer-assess each other’s work simple by sharing documents and inserting comments. At any moment in time during class I can put any of my students’ work up on the projector to share a teachable moment, or even browse through their work as they do it. It makes everyone’s learning and thinking more public, which I find a great asset to building a learning environment.
Overall, the results with digital scaffolded notes are just pretty cool. The scaffolding provides clear direction about the learning goals, and also guides students how to use technology to improve their understanding (bulleted lists, highlighting, diagraming, etc.). What’s more, digital notes are far more interactive and flexible than paper. Being able to insert relevant links and multimedia and take advantage of the excellent learning resources out there get the students more engaged because their classroom better reflects the technological world they live in- not just the world their teachers were taught in.
#2: Study Guides
I already mentioned how digital notes enable teachers to take advantage of the many online learning resources that are available, but it doesn’t end there. In the olden days, when students were told to “study”, that usually meant going back and re-reading the textbook or reviewing notes from class. The assumption is that learning takes place in the classroom, and studying is merely an act of remembering. Today we know that deep learning means more than that (for more detail on what I mean by “deep learning”, check out this article by renowned educator Jay McTighe). Deep learning goes way beyond simple recall to regurgitate on a test, it is about consolidating knowledge, understanding, and skills within your mind so that you can apply it successfully to new situations.
Deep learning doesn’t occur by simply revisiting the same stimuli (be they textbooks or notes) again and again. Deep learning requires as Jay McTighe puts it “multiple and varied representations of concepts and tasks”. How can you provide a variety of learning experiences when time in the classroom is so short? Simple: provide students the opportunity to learn anywhere, anytime. I do this with my students by creating interactive Study Guides.
A Study Guide traditionally means something that tells you everything you need to know, but an interactive Study Guide goes a step further by providing resources to help you learn those things. These Study Guides that I create are Google Docs that I include in every student’s digital notebook as a “view-only” file. As we go through a science unit, for every standard and learning goal in my science class, I provide a variety of learning resources in the interactive Study Guide that go beyond what we did in class to give students the opportunity review concepts from multiple sources and in multiple forms. Here’s an example from the Study Guide of the same Geology unit (click here for the whole document) you saw previously:
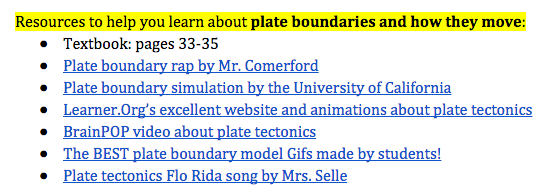
The example above guides students to readings, raps, simulations, videos, websites, animations and songs that all explore the same topic of plate boundaries in plate tectonics. I am careful to select resources that closely match the learning goals for my class, but there is such a plethora of stuff out there that it isn’t time-consuming at all. I have even started including work made by my students as a way of highlighting and promoting outstanding learning.
Do students look at these Study Guides often? Heck no- but when they need to consolidate their learning (i.e. before a test, or when completing a homework assignment on a topic they’re struggling with) I see lots of students on the document. I’ve polled my students as well, and they always cite the Study Guides as one of the most helpful resources for their learning.
#3: Long Live the Notebook
I actually started going paperless with my classes a year before I started using digital notebooks- and I immediately noticed the problem. As I shared more and more Google Docs with my students, they started to pile up in messy Google Drive folders that made them difficult to access and find again unless the students were diligent about organization. Since I teach Middle Schoolers, diligent was not going to happen. A digital notebook provides what the classic composition notebook or 3-ring binder always did so well: a familiar place to keep all that knowledge more or less organized. The advantage with the digital version is that this comforting organization is (almost) automatic.
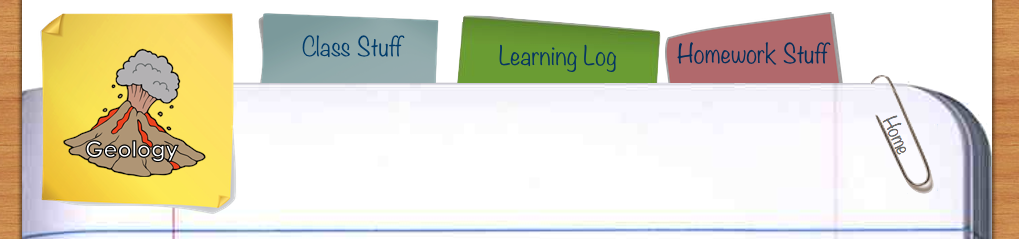
In my updated digital notebook template (click here to check it out), the Google Site begins with a home page that looks like the cover of a composition notebook (I couldn’t resist!), with clickable stickers for each of our units of study. This cover page allows for a lot of personalization: I have my students add their own photo (of themselves in a “scientific pose”), and also includes a slideshow of my science photos and a slideshow of their own that they can add their own science pictures too.

Within each unit there are three sub-sections: Class Stuff, Learning Logs, and Homework Stuff.
The Class Stuff tab is where all of the students class notes are housed (the interactive scaffolded notes I was describing earlier). To do this students simply insert their Science folder in Google Drive directly into their notebook, so that when I share a new document with them, it automatically appears there. There’s a catch though- to share a copy of your documents directly with your students in an automatic way like that, you’ll need to use another app to do it. I use Hapara for these kind of class documents, which my school pays for, but there are free options out there like Doctopus and Google Classroom. If you don’t use one of these, you can opt for the “old-fashioned” way of sharing your documents view-only with your students, having them make their own copy, and then drag it into the correct Google Drive folder… but I found this takes up to much valuable time and leaves too much opportunity for human error. So I highly recommend going with an automatic sharing option!
The Homework Stuff tab of my digital notebooks is simply a link to my class Google Classroom page, which if you haven’t heard, is an exiting new tool for teachers to use to share documents and collaborate with their students. It has only been out for a year, and has some frustrating limitations, but for dealing with digital assignments like homework I think it’s the best thing out there. The interface is smooth, with a Facebook-like stream that adds new assignments from the teacher at the top, and it easily allows teachers to share individual copies of assignments with students. The best feature though is the “Turn in” button, which students can use to virtually turn in their work when it is complete. Clicking this shifts editing rights from the student to the teacher, so the student can no longer make changes and the teacher can see instantly that it’s been turned in (no more collecting homework papers!). What’s more, you can virtually “return” the assignment back to the student which shifts the editing rights back to them, and they can make changes in “re-submit” the assignment to turn it back in again. I find this feature particularly useful on projects when students need to go back and make corrections.
#4: Learning Logs
The final trick of the trade that I’ve learned about digital notebooks is how to use them in conjunction with Learning Logs to help students track and reflect on their progress. I already blogged about Learning Logs in detail here, so I’m not going to repeat myself, but these are the final piece of my latest digital notebook version, and they have been a huge success with my students.
And there you have it- my latest and greatest advice on digital notebooking. For more technical details on how to create your own digital notebooks for your students, please check out the tutorial videos I created here on the Digital Notebooks page. If you do create your own version of a digital notebook, please share your experiences! From the increasing number emails and comments I’ve been receiving lately, I know there is a growing interest in teachers harnessing the power of digital notebooks for learning, and I’m excited to see the possibilities.


As a novice in working with sites, the question I have is what program did you use to set up the “stickers” on your notebook cover so they are all the same size and how did you get them to line up? Mine seem to have a mind of their own.
Great question! Unfortunately Google Sites is very clumsy with images, so I just had to make sure to keep my images the same size (using an app like Preview that lets you resize images) and make sure they were all centered with wrapping off. Even then it can be a pain though, so I just made a change to the template the should make it easier to edit. I put all of the stickers inside an invisible 4×2 table. So to add your own images, just delete the images and insert your own in each cell, making sure they are set to the small size (S) and left-aligned. Give the updated template a go and see if it makes things easier for you. If you still need help, send me an email- I don’t mind helping you out!
[…] « Digital Notebooks 2.0 […]
[…] can go ahead and check out the template notebook site here (or go here for my updated template). When it’s completely finished I plan on saving it as a GoogleSite template so others can […]
Good morning. I must say I absolutely love your videos. I am more knowledgeable about Microsoft Office suite (lol yes I know there are a ton of similitaries to Google Docs ). Is there a way to use Microsoft Word for a digital classroom instead of Google Docs
Unfortunately I don’t think Word would work well with a digital notebook like this- all the files would have to be uploaded and downloaded, which would be annoying. If you’re planning on making the documents collaborative for students, Docs is really the way to go.
If you already have your documents created in Microsoft Word, you can upload them to google docs, which will change them into a Google Doc. Word does have more features than Docs,though, so you may want to create them first and then convert them. 🙂
Just a quick thank you for updating your blog with such great, detailed information. I might not always join in the discussion, but your blog posts are helping me, other teachers, and hundreds of students in central Pennsylvania.
Wow- thanks Ryan! That’s great to hear 🙂
Nick, when I went to use your template to set up the digital notebook for my class, I got a permission error. I am able to set up the site using my personal google address, but not my school’s address. I asked my school’s tech admin about allowing it, and he said that it had to do with the way you’re sharing it (ie, you’re in one school district and I’m in another).
Do you have any suggestions for how I can use your template with my school’s address? Does it need to be shared differently, or do I need to start from scratch?
I second Ryan’s post. I too am getting a permission error. I would really like to use this template! Help a new science teacher out!!!
I am so excited to try this. Our school is starting a 1:1 initiative. We want to go Digital with our science notebooks this is a great starting place! : )
I have been using IN in my ELA class for years. I am interested in how you converted the paper notebook to digital. Question: if I have several graphic organizers in PDF, how can students “type on these documents” and give them back to me? This is the problem I run into when I played with Microsoft One Note.
Hi Angelann,
I can see how INs would be great for ELA students. Editing PDFs are tricky unfortunately- it’s possible if students have the full version of Adobe, but that’s not likely. I would recommend converting the PDFs into a Google Doc version that is editable by students. Either by remaking the graphic organizers using Google Drawings, which takes time but works well, or having students use a Google Drive add-on Lumin (https://www.luminpdf.com/static/support#adding-to-google-drive) to make the PDFs editable. I haven’t used Lumin myself though.
Is there any feature of googledocs that discourages students from sharing their documents with other students where information can just be copy and pasted between them? I was wanting to use a digitial lab notebook for our experiments but copy and paste cheating is a concern… although in todays era of cell phone pictures im not sure a paper notebook is any better.
I’m trying to edit “stickers” for the front page of my notebook but I can’t figure out how to add text. Does anyone have an easy way to do this?
Nick,
I am curious for how you are going to handle the New Google Sites. I absolutely LOVE your digital science notebooks!! The new Sites does not have all the great features old sites has. in 2018 we have to move to the new, I hope they will be adding back these features. Have you brainstormed any ideas for this? I am stumped.
So when I open the blank it doesn’t have the composition notebook background how would I get that 🙂
I have been using iPads and the students make their notebooks in Explain Everything. I plan on continuing to use it when we switch to Chromebooks next year.
I also do not see the composition notebook background. How can I do that?
When I open up the link for the digital notebook, it is not editable. This post was from 2015, is there a way to update it so I can use it for virtual learning this year?