My 3rd graders will soon begin their first science unit on light and sound, which in my opinion is a great way to start the year- it’s hard to beat making noise and playing with flashlights. Despite all the hands-on investigations that we’ve done in the past though, there’s always one phenomenon that students have trouble with: refraction, the bending of light. 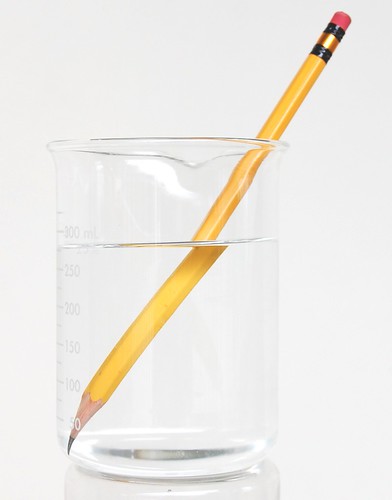
I think refraction stumps students because it contradicts their particle-based intuition. Other kinds of light behavior (absorption, reflection, and transmission) make sense even from a particle perspective because they have simple analogies: a sponge absorbing water, a ball bouncing off the ground, sand passing through a sieve. But light bending inside something?? It’s a lot to wrap your head around, even for teachers.
Since we tend to stick to observable phenomenon in elementary science, we don’t get into a discussion of light changing speeds in different mediums (not that that makes it any easier to comprehend anyway!). Instead we merely observe different examples of refraction: a “broken” pencil in water, lens magnification, prism-made rainbows, etc. Sure, students can be trained to say that refracting light is “bending”, but that’s only a superficial understanding of the phenomenon- why bother? This would seem to make refraction a candidate for the chopping block with the new effort to trim standards to only core ideas, but even in the new framework refraction is suggested at the elementary level:
[By the end of 5th grade students should understand that]… because lenses bend light beams, they can be used, singly or in combination, to provide magnified images of objects too small or too far away to be seen with the naked eye. (page 108)
So, how to deepen student’s understanding about refraction? Similar to my past post about making sound waves visible, this year I’m planning on using a simulation to supplement the experimental observation, and hopefully deepen student’s understanding. The simulation is called Bending Light from PhET, the University of Colorado at Boulder’s fantastic treasure-trove of free, online physics simulations. Most of the simulations are intended for older students, like this one is, but the interface is user-friendly enough that I think even my 3rd graders will be able to get a lot out of it.  From my Master’s in Ed days though, I remember reading that the main shortfall of using simulations is that students don’t always make the connection between real-life and the simulation. To avoid this, I’m going to try using the simulation and real-life observations in tandem.
For example, take one of our more traditional investigations, like observing the effects of concave and convex lenses. Students would usually look at a penny under the lenses and notice that the convex lens makes the penny look bigger, while the concave lens makes the penny look smaller. Big deal. Why do the different shaped lenses do this? Ummm…. What the students can’t observe easily is the bending of the light, so the lesson usually ends with me drawing a bunch of complicated looking ray diagrams on the board… and the students looking on blankly.
Let’s try that again. This year, right after students observe one the effect of one of the lenses on the penny, they’ll use the simulation to recreate the same setup. Take a look at the simulation screenshot of light shining through a convex lens. 
The cool thing about the simulation is that it shows what the light rays are actually doing with a simple ray diagram. So although they won’t necessarily understanding why refraction is occurring, they should get a deeper understanding of what is happening to the light. In the case with the convex lens above, the light is being bent together (or focused) so it makes objects appear bigger.
However, I should admit that I think there’s going to need to be some prep work done before we roll out the simulations to ensure that students understand what a ray diagram is in the first place. Since we begin the unit the more straightforward light behaviors, that would be a good time to introduce simple ray diagrams as a way of drawing what’s happening to light. For example, students should be able to observe and then draw what happens when light shines on glass: most of the rays transmit and a few are reflected. If students can grasp the ray diagram representation of light, and connect their observations of real-life with the simulations, I think their understanding of light will really shine this year (sorry, couldn’t resist :).
Read Full Post »
 This 6th grade geology teaches students how geological forces shape and change our Earth, including the basics of plate tectonics and the rock cycle. Also included in this unit is a mini-unit Engineering for Earthquakes that teaches students critical thinking skills and the engineering design process. It’s a big unit, so I’ve divided the documents into 3 sections: plate tectonics stuff, rock cycle stuff, and engineering for earthquakes stuff.


