Update: This post is my original instructions for setting up digital notebooks. For the updated version (and tutorial videos!) check out my Digital Notebook page.

After much fiddling around and way too much time spent trying to make it look “cool”, I’ve figured out the basics of how I’m doing digital science notebooks with my students this year. Several teachers out there have also expressed interest, so here’s the nitty gritty below of how I’m setting it up. One caveat though: my Middle School has a one-to-one laptop program, so my students basically always have their laptop with them and are already pretty well-versed in the technologies I’m using for this. So what works for me at my school might not be the best fit for you.
Step 1: Goodbye paper, hello GoogleDocs
All of the traditional papers that I would photocopy and hand out to my students in the past will instead be shared through GoogleDocs. GoogleDocs is a great way to digitally manage documents so that the teacher can decide whether students are editing documents individually or in groups as appropriate. Anytime the teacher (or another student for that matter) leaves a comment for a student on their document they get notified by email. In addition, whenever students makes a change to their document, GoogleDocs automatically saves it and keeps a record of when all changes were made (good for accountability). Last year I already used GoogleDocs for almost all my students’ homework assignments (here’s an example), and it worked well. Now I’ll be taking it one step further and turning everything digital: notes sheets, lab reports, handouts, homework… which means no more collecting, lugging around, and passing out papers. Yay.
Step 2: Manage GoogleDocs without making a mess
A lot of people who “don’t like GoogleDocs” complain because if it’s left untended, your Google Drive page starts looking like the email inbox from hell. Since all of the documents that you create and edit will show up there, you need to set up some organizational system to make it easier to access the documents you actually want. Last year my students and I created shared folders for our GoogleDocs to simplify things. Everything I dumped into my shared folder was automatically shared with my students, then they would make a copies of those master documents and put them in their own GoogleDoc folder that was shared with me. Decent solution, but Middle Schoolers being Middle Schoolers, there was always a handful that would forget to share their copy with me, leading to a recurring digital paper chase.
This year my school is paying for Hapara which creates software that handles all this organization for me. With a few clicks documents are automatically shared with the right students and accessible by me. Hapara also gives teachers a handy “teacher dashboard” that will show you at a glance all your students GoogleDoc documents- whether or not they have remembered to share them with you:

Hapara Teacher Dashboard
Don’t have Hapara? It’s certainly not a deal-breaker, since you can manage GoogleDocs yourself with a little pre-planning like I did last year, but there’s also a free option out there: Doctopus. Created by an awesome educator who’s work I just discovered on YouPD.org, this GoogleDocs script also lets you automate the generating and sharing of digital documents.
Step 3: Putting the “notebook” in a digital notebook
As great as GoogleDocs is as an education tool, without a way of organizing documents in the same way you would within a traditional 3-ring binder or notebook, all these digital documents float electronically around in students’ files the same way their paper counterparts do in the messy backpacks teachers abhor. In my switch from paper to electronic documents, my first two goals were to find a way to make digital notebooks better at organization and presentation than traditional notebooks. So the last step is to figure out how to tie all these digital documents together, easily and elegantly.
There are several different options I considered (Blogger, LiveBinders, EverNote) but in the end I decided on using GoogleSites to create the notebook. Most of my students already have experience making websites on GoogleSites, so that played a part in the decision, but the main reasons were the flexbility offered by a website and the synergy between GoogleSites and GoogleDocs.
The flexibility of a website allowed me to go retro and design a digital notebook that looked like a classic composition notebook:

By clicking on the “stickers” on the notebook cover, students can navigate to the different units we study, and then within each unit there’s a section for Class Stuff, Lab Stuff, and Homework Stuff which look like Post-its in an actual notebook:

You can actually insert entire folders of your GoogleDocs onto a GoogleSite, which means my students won’t have to individually add documents to their digital notebooks- they will be added automatically whenever I create a new document and put it into one of their shared folders (no wasted class time!).
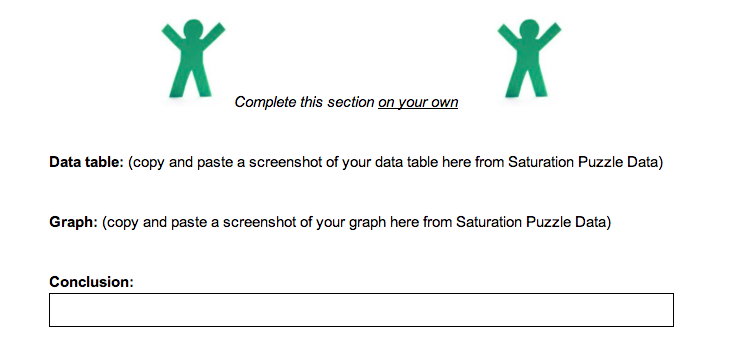
Using GoogleSites also makes it easy for students to incorporate anything created with GoogleDocs in their digital notebook: data tables or graphs made in Google Spreadsheets, scientific sketches made with Google Drawings, Google presentation projects, Picasa photo slideshows, the list goes on and on. I want their notebook to be able to easily highlight their best work so it doubles as a portfolio, and GoogleSites will allow student to do this easily without jumping through a lot of technical hoops. I’m also working on the possibility of creating a “learning dashboard” for each student that will display their progress on the learning goals for each unit and guide them to helpful resources when they fall short of meeting expectations (more on this later!).
You can go ahead and check out the template notebook site here (or go here for my updated template). When it’s completely finished I plan on saving it as a GoogleSite template so others can use it as they see fit.
Read Full Post »
 Last school year I used digital notebooks with my 6th grade science students in place of traditional science notebooks, and I’ve received a lot of interest and questions from teachers out there who want to know more about how to set them up. I posted last summer about the basics of setting up digital notebooks, but one of my readers (thanks Belinda!) made a great suggestion to create some videos that could walk people through the process. So my new summer project is making a series of short tutorials that will explain both the nitty gritty details of setting them up and also show off some of the advantages over paper notebooks. Hopefully this will enable anyone out there- tech savvy or not- to give digital notebooks a try!

 To create our technology rules I based them on our school’s 4 core values of respect, honesty, responsibility, and compassion (see the template on the left). Unfortunately I don’t have a finished copy of the rules- I was a little to zealous in my classroom cleaning this week- but I’ll need to improve them anyway because there were things I didn’t anticipate. Here’s a sampling of some of the rules:
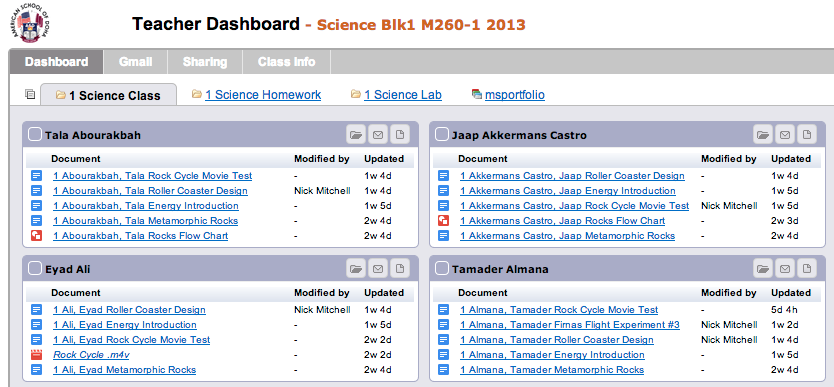
 In
In 

